Vue - Vuex 구조 및 사용법
Vuex란?
- Vuex란?
- Vue.js의 상태관리 패턴이자 라이브러리
- React의 Redux와 같은 역할
- 컴포넌트간에 데이터를 전달할 때 props와 emit를 사용하는데, 이는 컴포넌트가 많아질수록 관리하기가 어려워진다.
- 이를 해결하기 위해 Vuex를 사용한다.
- Vuex는 컴포넌트들의 데이터를 하나의 중앙 저장소에서 관리한다.
- vue Devtools를 사용하면 Vuex의 상태를 확인할 수 있다. -> 안에 데이터 어떻게 들어가는지 확인가능
Vuex의 구조 및 이해 (Spring의 MVC로 설명해보기)
- Vuex의 구조
- Vuex는 크게 4가지로 구성되어 있다.
-
State, Getters, Mutations, Actions, index
- Actions = 특정 행동을 통한 로직 수행
- Mutations = State를 변경
- State = 데이터를 저장
- Getters = State의 값을 가져와서 렌더링 됨
- index = index 파일에서 여려개의 모듈을 import 하는 역할이다.
나는 위처럼 Spring의 MVC 패턴 느낌으로 비교하니 이해가 쉬웠다.
Vuex 사용법 및 예시
- 현재, TypeScript를 사용하고 있기 때문에, TypeScript를 사용한 Vuex 사용법을 설명하겠다.
- 또, Vue-Class-Component를 사용하고 있기 때문에, Vue-Class-Component를 사용한 Vuex 사용법을 설명하겠다.
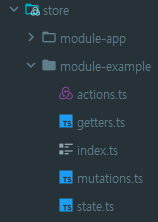
- store 폴더에 modules 폴더를 생성한다.
- modules 폴더에 각각의 모듈을 생성한다.
- 각각의 모듈에 State, Getters, Mutations, Actions, index를 생성한다.
index.ts 파일 내용
StateInterface는 store/index.ts에 있는 StateInterface와 같아야 한다.
import { Module } from 'vuex';
import { StateInterface } from '../index';
import state from './state';
import actions from './actions';
import getters from './getters';
import mutations from './mutations';

export interface ExampleStateInterface {
  prop: boolean;
}

const module: Module<ExampleStateInterface, StateInterface> = {
  namespaced: true,
  actions,
  getters,
  mutations,
  state,
};

export default module;
store/index.ts 파일 내용
export interface StateInterface {
  // Define your own store structure, using submodules if needed
  // example: ExampleStateInterface;
  // Declared as unknown to avoid linting issue. Best to strongly type as per the line above.
  example: unknown;
}

// provide typings for `this.$store`
declare module '@vue/runtime-core' {
  interface ComponentCustomProperties {
    $store: VuexStore<StateInterface>;
  }
}

export default store(function (/* { ssrContext } */) {
  const Store = createStore<StateInterface>({
    modules: {
      example: example,
    },
    plugins: [
      async (store) => {
        await store.dispatch('example/init');
      },
    ],

    // 보통 production 환경에서는 strict를 false로 설정한다.
    strict: true,
  });

  return Store;
});
actions.ts 파일 내용
import { ActionTree } from 'vuex';
import { StateInterface } from '../index';
import { ExampleStateInterface } from './index';

const actions: ActionTree<ExampleStateInterface, StateInterface> = {
  setExample(context, payload) {
    context.commit('setExample', payload);
  },
};

export default actions;
mutations.ts 파일 내용
import { MutationTree } from 'vuex';
import { ExampleStateInterface } from './index';

const mutation: MutationTree<ExampleStateInterface> = {
  setExample(state, payload) {
    state.setExample = payload;
  },
};

export default mutation;
state.ts 파일 내용
import { ExampleStateInterface } from './index';

function state(): ExampleStateInterface {
  return {
    example: 0,
  };
}

export default state;
getters.ts 파일 내용
import { GetterTree } from 'vuex';
import { StateInterface } from '../index';
import { ExampleStateInterface } from './index';

const getters: GetterTree<ExampleStateInterface, StateInterface> = {
  getExample(state) {
    return state.example;
  },
};

export default getters;
Actions 하는방법과 Getters 하는 방법 예시
// Actions 하는 방법
// payload는 보통 객체로 넘겨준다.
this.$store.dispatch('example/setExample', payload);

// Getters 하는 방법
// 아래는 vue-class-component를 사용한 예시이다.
// binding-helper를 사용하여 Getters를 가져온다.
import { Getter } from 'vuex-class';

@Getter('example/getExample') example!: number;
-> example 값을 vue에서 사용할 수 있다.
-> vuex의 변경되는 값이 바로바로 반영된다.
댓글남기기